Wooden boards fence: Building DIY
Post from EditorialsWooden boards fence: representation with drawings, methods of DIY building, to obtain robust screens to guarantee the privacy.
Fences in wooden boarding provide privacy
The fences of the properties may be constituted by wooden planks, which may be suitable in many residential or commercial applications.
They possess the added advantage of offering maximum privacy since they are extremely shielding.
The naturalness of the wood properly treated enables excellent performance both from the aesthetic and in terms of structural strength, if the artifact is performed in a workmanlike manner.
Design of wooden boarding fences
In the next depiction I have illustrated the construction scheme for a fence composed of parallel wooden boards, to form a solid and impenetrable vertical boarding.
We use specific tapered boards, that is characterized by a side thinner of the other in such a way as to make them superimposable forming a sturdy opaque structure.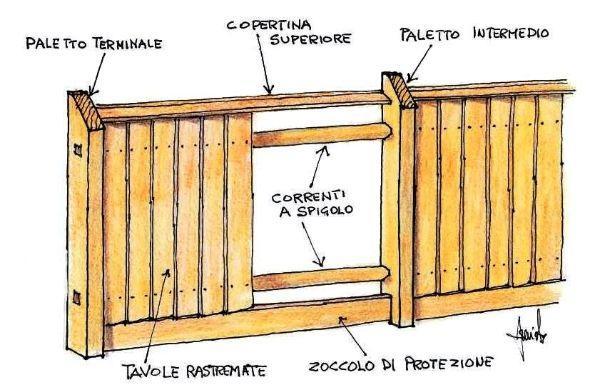
These vertical boards used to close the fence must be nailed on the horizontal axis with a triangular section called corner braces.
In their turn, the horizontal braces must be embedded in the so-called mortises, that is, in suitable holes made within the thickness of the vertical supporting stakes; the latter can be found already equipped with mortise but if you use common timber stakes, you must practice the specific holes.
On wooden planed sticks you need to perform the mortises, of approximately 5x2 cm, positioning them 15 cm above the ground level, and under the heads of the tapered boards, so as to provide the interlocking for two horizontal braces, as well as I indicated in the above design.
In case of more than one meter high fences, I advice to practice on each stick also an intermediate mortise to include a third brace edge, placed halfway up between the other two.
Construction of the fence: the braces are interlocked to the sticks
In the diagram below I represented the interlocking mortise and tenon, which is the classic combination of male-female, widely used in carpentry and building structure in general, because it ensures excellent stability and strength to the resulting artifact.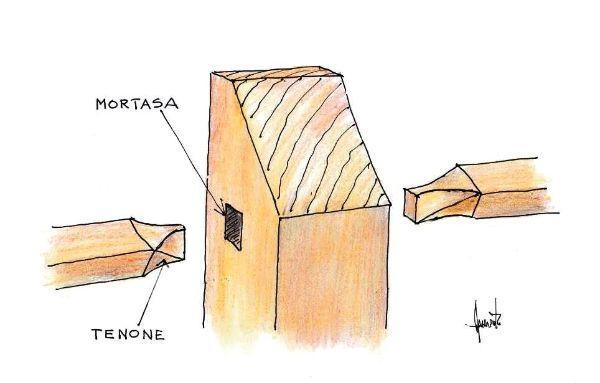
The holes in the mortise should be positioned approximately 2 cm from the front edge of the pallet; they are made with the drill with a wood drill bit, then with a hammer and chisel you must remove the marked material.
Each mortise must be finished with rasp, file or sandpaper making homogeneous and smooth walls.
As you build the fence, cut to fit the horizontal braces and perform the tenons at their ends.
In practice, you mark with a pencil the length of the tenon and shape the tip with a ripsaw, finishing with a rasp or file roughing.
You must apply a special protective paint for wood with tips shaped and mortise, before assembling the ledgers.
So it puts in place the first stake compressing the concrete around its base.
With the stick held in place (perhaps using two provisional boards placed diagonally) you place in the edge current; implants the next stake next tapping the ends of the horizontal beams with a wooden mallet.
Before casting the concrete around the second stick, you make sure the braces and the sticks are perfectly square.
The edge braces are fixed with a nail for tenon, planted in diagonal through the sticks, so as to increase the structural strength in toto.
The poured concrete around the pallets must be compressed and allowed to harden for approximately one week.
Mounting the lower protection board
Before even to fix the vertical boards, it is necessary to fit a horizontal board below, ie a true protective base, in order to avoid that the vertical boards can rot, if left with their ends in direct contact with the ground.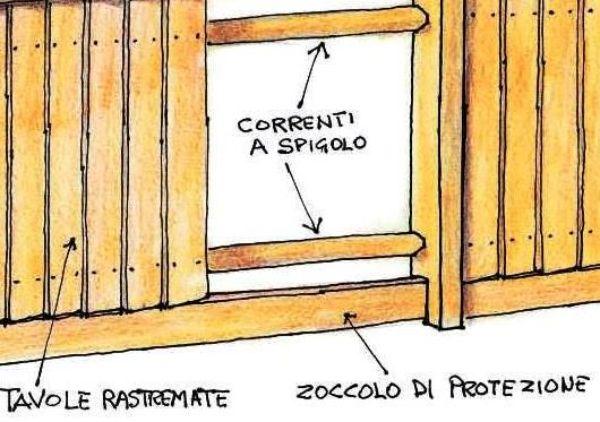
These lower security boards are to be nailed to the sticks by means of special wooden heels nailed in turn at the foot of each stick, so as to obtain a solid anchor.
Attaching the tapered boards with spacer block
The tapered boards are cut to measure (that is, with a thicker side), taking care to treat with protective paint the exposed grain of the ends.
The first board must be positioned vertically on the hoof of protection, with the thicker edge against the stick.
Nail the board to the current brace with galvanized nails planted about 2 cm from the thicker edge.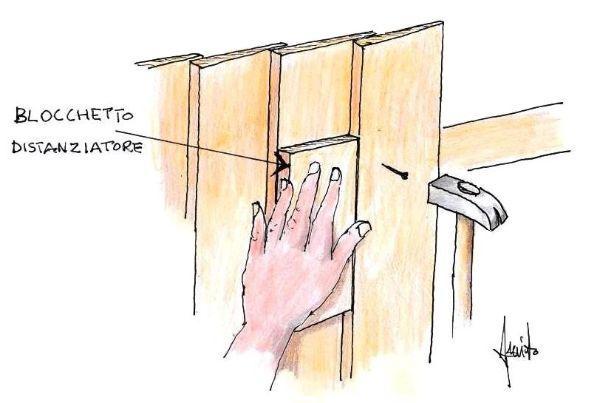
You place the next board, overlapping the thin edge of the already fixed one, then tip the nail beyond the overlay; in other words, the nails should be planted only between each table and the horizontal braces, never through the two plates or else the timber may not expand and shrink freely.
To obtain a regular spacing of the boards, you can make a rudimentary spacer simply with a block of wood, as I indicated in the drawing.
Settle the last board comparing it to the near stick, then fix it with two brace nails.
Finishing fence with protective covers
Once the fence is complete, finish it on the top with a dust cover, nailed directly over the heads of the vertical boards.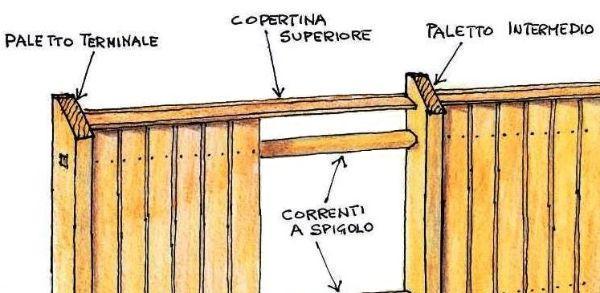
The cover has the function of protecting the structure from rain, giving even further stability. Finally, cut the end of each stick to measure, diagonally.
In DIY mode are achievable small jobs for our open spaces; just good will and skill to achieve satisfactory and durable results.
A specialized advice to redistribute the interior and exterior of the house is available through our exclusive service of freehand design, able to formulate reasoned solutions designed to realize the proper housing functionality in any residential setting.
79735 REGISTERED USERS


