Relining armchairs and sofas
Post from EditorialsAlmost all of the upholstered chairs can be covered with linings if properly cut, shaped and made to measure. Here are the steps to follow.
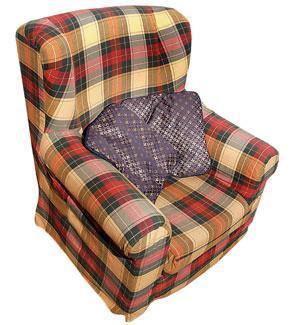 The relining is an intelligent system to renew a bit dated armchair or an old granny's sofa or chair purchased at a flea market.
The main feature is that liners can be removed when they are dirty and they can be replaced without any difficulty.
In addition, if they are made in pairs, in different fabrics, allow you to change the decor of a room from time to time.
It is important to choose a soft fabric, specific for this type of work.
It should be hard-wearing, tightly woven, with indelible colors and already restricted by a previous washing.
Avoid knitted or heavily textured fabrics because they can be difficult to work with, especially if you want to insert the profiles in the seams.
Before you buy the fabric you need to do the lining up, you need to determine the dimensions dissecting the piece of forniture.
Measurements
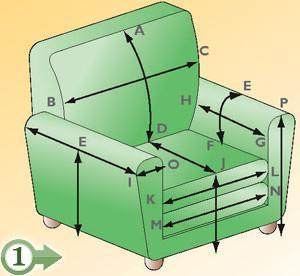 (1) Remove the cushions of the chair, (measure them apart) and with the tape measure, measure the widest point horizontally and vertically, in the longest point, each section of the chair.
If you want to finish the chair with a flounce, subtract 15 cm from the external measurement of the length of the armrests, backrest, armrests and front band.
Outside behind: from A down to the floor and from B to C.
Inside back: from A to D + 15 cm margin for the tuck; from B to C.
Inside armrest: from E to F + 15 cm for the tuck; from G to H + 15 cm for the tuck.
Outside armrest: from E to the floor, from B to I (imaginary line).
Seat: from J to D + 15 cm for the tuck; from K to L + 15 cm for the tuck on both sides.
Edge: measure from J to the floor, from M to N.
Front armrest: measure from I to O, from P to the floor.
Add a margin of 3 cm to every taken measurement.
Sections
 In most cases the sections and the seams of the lining should match those of the original piece of forniture.
A particular case is represented by the rounded armrests where the lining should have the junction on the line of view, that is an imaginary line on the outside of the armrest.
This imaginary line is placed on the outside of the armrest rather than inside, in order to easily slip the lining.
To some sections of the lining are added some margins are added, for the tuck, which can be inserted in the recess of the seat, where the backrest is joined to the seat and to the armrests.
This keeps the lining still and prevents it of being subjected to tension.
Finishing
Profiles: You should outline all the major seams, those that are more noticeable.
Smooth base: for a smooth base to be fixed under the armchair or sofa calculate the fabric so as to cut four strips 10 cm high and long as each side of the chair or the couch.
Straight flounce: for a straight flounce, measure the width of each side.
For the height, calculate a flounce that when it is finished (including hems) is not higher than 15-18 cm.
Needed fabric
To achieve the armchair slipcover you do not need a paper model because you model the fabric directly on the piece of forniture realizing later rectangles suitably cut into the approximate size of each section.
Before you buy the fabric, calculate the necessary length according to the measurements of each section.
Based on these, plot a cutting pattern.
Cutting diagram
Use a simple scale, for example 1 mm equal to 1 cm and draw on a sheet of paper two parallel lines that represent the width of the fabric.
 On another sheet of paper draw, with the same scale, some rectangles for each section. Number each rectangle and note down the sizes.
Cut these rectangles and arrange them next to each other on the reduced design of the piece of cloth with the measures in parallel length to the selvages.
Measure the length of the schema, convert it in scale and add the margins for the profile to get the required amount of fabric.
Then cut the scale models and cut individual pieces of fabric.
Then place them on the counter for the necessary control.
Make any changes if necessary.
Modeling linings
The method to model the sections of the chair or sofa is to fold them in half, wrong sides together and proceed from the center outwards, fit them, pin them and foist them.
Finally open the fabric and sew the sections together.
Start with pins marking a center line on the old armchair slipcover.
(2) Outside back.
Fold the fabric in half and place the fold on the line marked with pins on the back so that the edges stick out at the top, sides and bottom.
Secure the fold to the below lining with pins, then smooth the cover to the side and pin back on the union line with pins.
Hold the fabric straight and pin it around.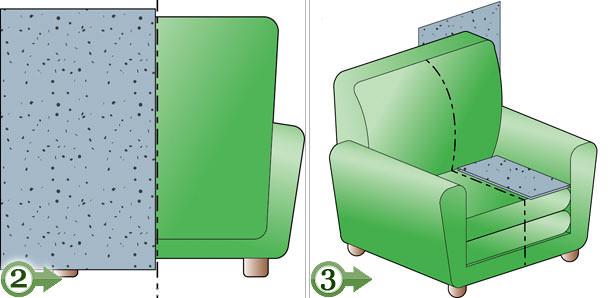
(3) Seat.
Bent and pin the fabric on the middle of the seat keeping the edge from theback tuck and on the side and the seam edge that comes out on the front.
(4) Back inside.
Bent and fix the fabric to the old lining, then pin it to the exterior backrest following the shape and the union line of the padding.
Pin the pieces along the edges, working from the top down, following the line of junction of the padding.
The arm, shape the fabric so that it follows the profile and reach back inside.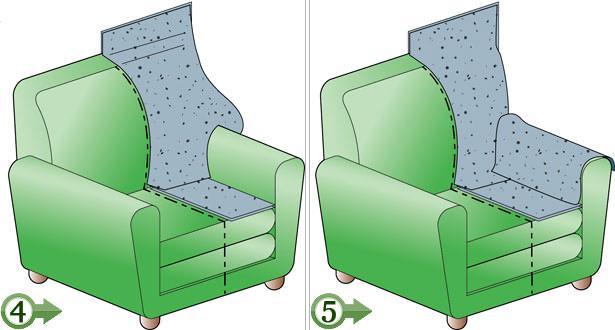
(5) Interior armrests.
Place the fabric wrong sides, in the inner part of the armrest, so that the edges come out to the front and the upper overlaps the same armrest.
Pin the edge and smooth the fabric with your hands on the armrest.
The bottom edge must be pinned to the one of the tuck and cut so that it corresponds to the inner backrest.
(6) external armrests.
Arrange the pieces, wrong sides together, with the edges coming out to the front and the top part coming out of 20 mm on the front.
Pin the fabric in the inner part of the armrests and the edge behind the external back.
Let the front edge free, but pin to the bottom edge to the old lining.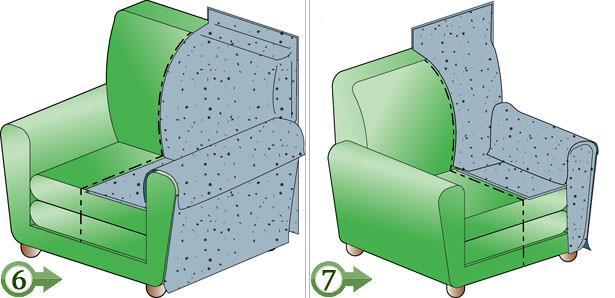
(7) Front armrests.
Push the tuck in then place the armrest front fabric in their place, wrong sides together, pinning them to the internal and external sections and following the shape and the original seam.
Pin to tuck's inside armrest.
(8) Mark the seams.
Trimm with scissors all the edges exactly 20 mm from the pinned lines.
Mark notches (small nicks in a triangle) so that the pieces fit easily together following the curves.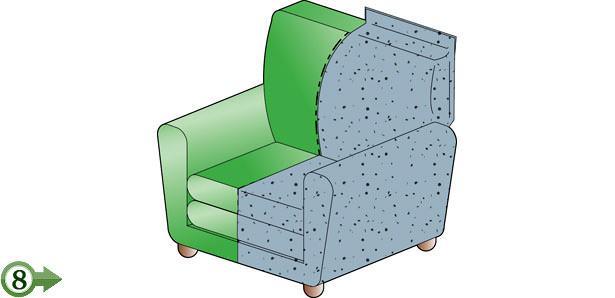
(9) Do the linings up.
Remove all the pins from the sections taking them away from the chair and opening them well.
Prepare the sections joining them together as you bast the pieces.
Carry out the basting keeping to a distance of 20 mm from the edges.
When all the pieces are joined together sew them together with the sewing machine by placing the pieces right against right.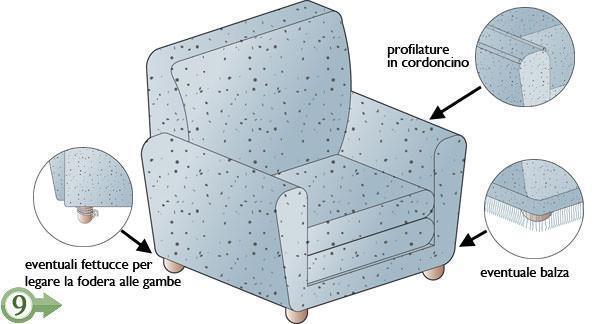
Do all the seams, iron them and finished the hems with zigzag stitching, cut any fabric in excess with serrated scissors.
You can decide to open the rear of the chair among many solutions.
Choose between the hinge or the fast and easy Velcro.
If you intend to profile the chair with a drawstring remember to wet it beforehand, as being of cotton it will shrink.
Use a cord that you will sew medium size with a sub.
Front edge
Put the cover on the chair with the right side to the outside.
Roll the sides up and let the seam to extend beyond the front edge of the seat. Place the board in place and pin it to the armchair and to the tuck's seam edge, wrong sides together.
Pin it also to the tuck under the armrests of the seat.
Trimm to 20 mm.
Remove the cover and sew the edge of the lining, right against right.
Finally, you can hide the legs with folds all around.
80835 REGISTERED USERS


