Perpendicular walls: Building Techniques
Post from EditorialsPerpendicular walls: drawings representative of methods used in DIY, creating attractive dividing walls to feature spaces.
Building intersecting walls at right angles
When making small construction in simple DIY mode, for indoor or outdoor spaces, one often uses walls that are orthogonal to each other .
In the case of the external arrangement, the perpendicular walls are useful to delineate areas such as the terrace garden, the pool from the outdoor living room, the solarium by the barbecue area and so on.
Even for interior rustic type, you can experience the successful implementation of low walls at the intersection, for example, to separate a kitchen corner from the living room, or to demarcate differences in height dimension characterized by the platform.
Bricks laid alternately, to tie the T stone walls
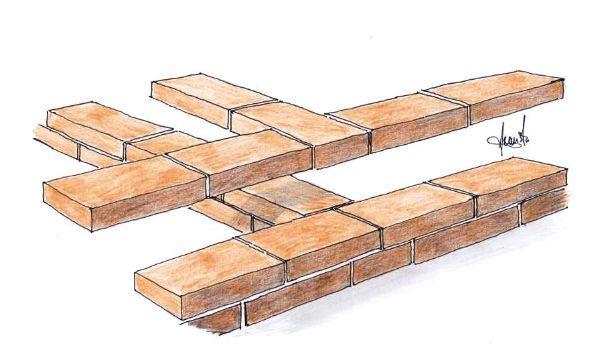
When constructing ex novo the walls garden that intersect at right angles, they can be linked together, precisely through the laying scheme of the bricks themselves, by positioning them so as to automatically create a robust joint. 
In the above depiction I have simulated the laying scheme in alternating blocks, in which each layer overlapping the other presents the bricks perpendicular to each other in the junction area between the two intersecting walls, in order to donate an inner stability to the structure in its entirety. Further ligation is achieved by placing the so-called reinforcement bar over the same angle, as I highlighted in the detail on the side.
These wire mesh must be embedded in the mortar bed, or at least every three layers of bricks; if the walls that intersect are long more than 2 meters, it is appropriate to carry out the coupling with both iron profiles, either by means of the specific metal reinforcement.
A steel channel enables the perpendicular fixing of the wall
Let's see now if you want to create a perpendicular joint on an already existing wall, for example, to build a new wall that intersects an existing wall of the house.
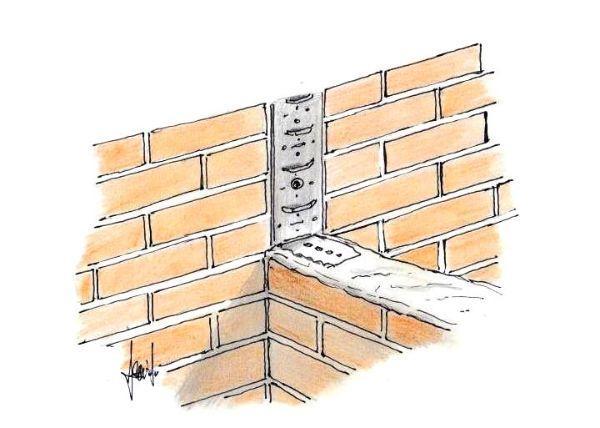
A very convenient and fast system, used as a vertical guide for the implementation of the new perpendicular wall, is to screw to the old wall a special channel in stainless steel - identified in the plan - designed to accommodate the bricks; This vertical channel also provides the anchor points to the reinforcement bar that will be installed later.
You need to screw the channel to the existing masonry with wall plugs and long pins in stainless steel or with simple expansion bolts.
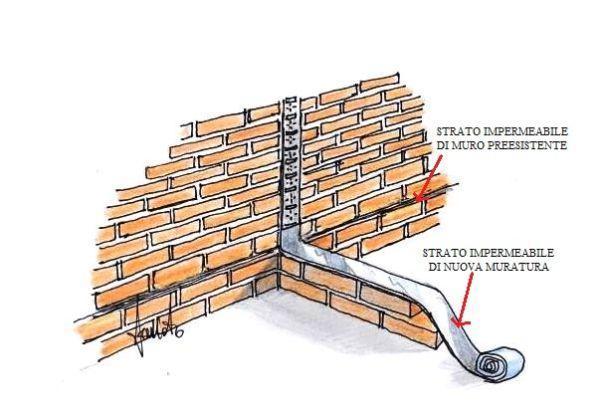
If you want to connect a perpendicular wall, indoor or outdoor, on a perimeter wall on the ground floor of a building, this will almost certainly be equipped with a waterproof layer, consisting of suitable insulation posed at the time to counter the rise of' moisture from the soil.
The waterproof material is usually placed in the mortar bed, 15 cm from ground level, ie on the second layer of bricks, as seen along the perimeter wall shown in the above drawing.
The insulating layer of the new walls must match that of the existing structures; you should use the tarred felt width equal to the thickness of the wall under construction.
Locate the waterproof layer of the house and proceed building the first brick layers of the future intersecting wall.
On the bricks of the second course, lies a thin mortar bed, on which you can lay the insulating layer, with one end of the roll folded back against the existing wall.
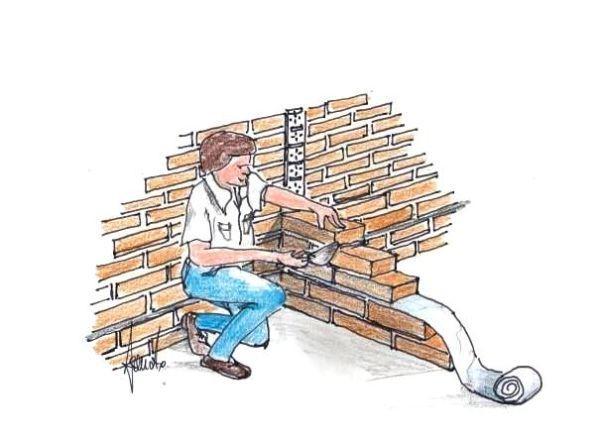
Laying of the interlocking bricks along the vertical channel
Lay the mortar also on the upper face of the waterproof layer, in such a way as to obtain the standard bed of 1 cm preparing the laying of the next course.
The felt of the waterproof layer remains locked between the head of the brick and the existing wall.
You must apply the mortar to the head of the bricks before putting the same in the vertical guide channel; among other things, while pressing the blocks into place, the mortar escapes through holes in the channel, firmly tying the new brick against the old wall.
The anchor reinforcement bar ensures structural stability
Every three courses of brick, we must strengthen the tie between the two perpendicular walls, placing the appropriate reinforcement bar.
These metal reinforcements must be fixed on special printed hooks along the steel channel; then they are pressed into the mortar bed, to ensure the structural solidity of the junction between the two orthogonal walls.
If you want to build the wall at right angles on an outdoor area, characterized by a slope of the land, you must established foundations steps, so as to maintain the top level of the new masonry; in such case, also the waterproof layer will have to follow a course with steps, as well as the underlying foundation.
The interior and exterior of the house can be characterized with such pleasing partition walls which, depending on the heights, thicknesses and locations chosen, will be able to redefine in a very personal way the distinct functional areas.
Our exclusive online service for freehand design offers a careful and reasoned space processing, through creative ideations architectural and high-performance, able to build new and more sophisticated living quarters.
79806 REGISTERED USERS


